SMESH
The afem.smesh packages provides entities and tools for working with the
meshing library which is a standalone version from the Salome Platform. Similar
to the OpenCASCADE C++ library, the SMESH library is linked to OpenCASCADE and
exposed to Python via pybind11. To provide a more intuitive and “Pythonic” user
interface, the smesh package within AFEM provides a number of wrappers
around the core SMESH entities. This approach is similar to the geometry
package. The entities and tools can be imported by:
from afem.smesh import *
There are a few key concepts and entities that need to be understood by the user in order use the meshing package effectively. These are best discussed by working through a simple but complete example:
from afem.graphics import Viewer
from afem.smesh import (MeshGen, NetgenAlgo2D, NetgenSimple2D, MaxLength1D,
                        Regular1D)
from afem.topology import *

# Create a simple solid box
box = BoxBySize(10, 10, 10).solid

# Get a list of faces and edges of the shape for later use
faces = box.faces
edges = box.edges

# Initialize the mesh generator
gen = MeshGen()

# Create a new mesh using the box as the shape
mesh = gen.create_mesh(box)

# Define algorithms and hypotheses
alg2d = NetgenAlgo2D(gen)
hyp2d_1 = NetgenSimple2D(gen, 1.)
hyp2d_2 = NetgenSimple2D(gen, 1., allow_quads=False)
alg1d = Regular1D(gen)
hyp1d = MaxLength1D(gen, 0.25)

# Add them to the mesh
mesh.add_hypotheses([alg2d, hyp2d_1])
mesh.add_hypothesis(hyp2d_2, faces[-1])
mesh.add_hypotheses([alg1d, hyp1d], edges[-1])

# Compute the mesh
gen.compute(mesh)

# View the mesh
gui = Viewer()
gui.add(mesh)
gui.start()
gui.clear()

# Get sub-meshes from sub-shapes
face_submesh = mesh.get_submesh(faces[0])
edge_submesh = mesh.get_submesh(edges[0])

# View the face sub-mesh (2-D elements)
gui.add(face_submesh)
gui.start()
gui.clear()

# View the edge sub-mesh (1-D elements)
gui.add(edge_submesh)
gui.start()
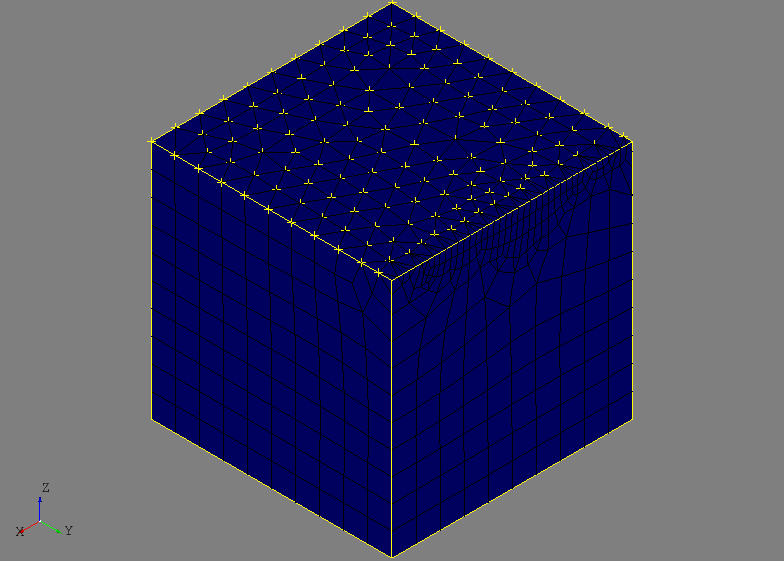
This example creates a simple solid box and then generates a 2-D mesh on its faces. Like any other Python script or module, the required entities must be imported:
from afem.graphics import Viewer
from afem.smesh import (MeshGen, NetgenAlgo2D, NetgenSimple2D, MaxLength1D,
                        Regular1D)
from afem.topology import *
The BoxBySize tool is used to create a simple solid box:
bbox = BoxBySize(10, 10, 10).solid
Providing three numbers creates a box with one corner at (0, 0, 0) and the other at x=10, y=10, and z=10.
When it is time to begin the meshing process, it is required to first
initialize the core mesh generator and data structure MeshGen. This
entity is responsible for managing the entire meshing data structure and
typically only one should be created. Generating more than one instance might
be used if two entirely different meshes need to be created in a single
process. Create an instance by:
gen = MeshGen()
The reference to this variable (gen is this example) should not be
destroyed until the meshing process is complete. When the reference count drops
to zero, the entire meshing data structure will be destroyed and the memory
freed.
A new mesh entity is created by:
mesh = gen.create_mesh(box)
The box variable is provided to this method so that is sets the box as the
“shape to mesh.” Selecting the shape to mesh is an important step as this main
shape will be used to derive and access information if sub-meshes or local
meshing controls are applied later in the process. In practice, the main shape
to mesh will typically be a single Compound that contains all the
shapes of the current model. An error will result if a sub-mesh or local mesh
control is applied to a sub-shape that is not a member of the original main
shape.
The next step in the meshing process is usually to define algorithms and hypotheses that will control mesh types and parameters like edge length and gradation. Usually, it is required to apply both an algorithm and hypothesis to a shape. The algorithm controls execution within the meshing process while a hypothesis controls the meshing parameters. In the example, a 2-D algorithm and hypothesis is created for the Netgen mesh generator that will generate 2-D elements on the faces of the shape:
alg2d = NetgenAlgo2D(gen)
hyp2d_1 = NetgenSimple2D(gen, 1.)
hyp2d_2 = NetgenSimple2D(gen, 1., allow_quads=False)
The hyp2d_1 will be the default global hypothesis and hyp2d_2 is
created to generate a triangular mesh. At the same time, a 1-D algorithm and
hypothesis is created that will be used to control the mesh on specific edges:
alg1d = Regular1D(gen)
hyp1d = MaxLength1D(gen, 0.25)
These algorithms and hypotheses can be added to the mesh and sub-shapes if applicable. First, the global algorithm and hypothesis is applied:
mesh.add_hypotheses([alg2d, hyp2d_1])
Here, no shape is provided so this algorithm and hypothesis is applied to the main shape and all applicable sub-shapes. If more local control is desired, algorithms and hypotheses must be added along with their associated sub-shape(s):
mesh.add_hypothesis(hyp2d_2, faces[-1])
The second hypothesis using triangles is added to one of the faces of the main shape. Only the new hypothesis was applied since the same algorithm can be used. Controlling the mesh along a specific edge can be done by:
mesh.add_hypotheses([alg1d, hyp1d], edges[-1])
It should be noted that the provided shape (or sub-shape) can be a single shape
like an edge, face, or solid, but it could also be a compound of multiple
shapes or sub-shapes. That is, edges could be put into a Compound and
the 1-D controls would be applied to all edges in that compound.
With the shape set and meshing controls applied, the mesh is computed by:
gen.compute(mesh)
The next part of the script simply displays the mesh and sub-meshes derived from sub-shapes of the main shape. These sub-meshes can be used to access nodes and elements.

Towards the end of the script a small demonstration of the MeshGroup
class is provided:
# Use groups to organize mesh data
edge_nodes = mesh.create_group('edge nodes', mesh.NODE, edges[-1])
face_nodes = mesh.create_group('face nodes', mesh.NODE, faces[-1])
Mesh groups are an excellent mechanism for organizing and accessing mesh data. The code above creates two groups of nodes on an edge and a face of the box. Other types of groups can be created for 1-D edge elements, as well as 2-D face elements including triangles and quadrangles. These groups make accessing the mesh data from the given shape much easier, flexible, and robust then using sub-meshes (this is not the intended purpose of sub-meshes anyway). Mesh groups can actually be created before the mesh is computed.
For mesh groups of similar type, additional organizational methods are provided including union, intersect, and subtracting the mesh data between two groups. In the example below, the nodes from the edge group are subtracted from the nodes in the face group:
group = face_nodes.subtract(edge_nodes)
A new group is created (without association to any shape) and is shown below. The same operations will be available for any two groups of similar type.